Maintaining the correct oil level is vital to your vehicle’s operations. Going too low can cause your engine to get hot or let much needed lubricating to seize, while too much oil can cause aeration and create a foam-like layer, and foam is not something you want to see in your engine.
So, here’s everything you need to know about your vehicle's oil system.
Read on to learn more in this article of shine armor blog!
Preparations
Before doing anything to your vehicle, you should always prepare yourself and your tools for the tasks ahead.
When dealing with anything in the engine bay, there is a possibility of getting a little dirty. It’s not encouraged to wear white, or other light colors that could be stained by grease or grime.
If you don’t like the idea of getting engine oil on your hands, or if you have sensitive skin, you can wear latex, neoprene, or similar-type gloves.
What You Need
- Clean, well-lit work area
- Clean, lint-free rag or paper towel
- White piece of paper
- Engine oil matching specific to your vehicle
- Funnel (optional, but highly suggested)
- Gloves (optional)
Clean Work Area
A clean, well-lit work area has the ability to make or break the ease of regular maintenance. Cleanliness allows you to not trip over things, and if you were to drop something, such as the cap to your new engine oil, it will be easily found and relatively clean.
Good lighting allows you to see clearly as well as actually inspect the engine oil.
If you are checking your engine oil while getting gas, which is common, you should get enough lights with either the sun, or the overhead lighting. This is also a great place to grab a lint free paper towel, which are often available near the pumps.
Clean Lint Free Rag
A clean rag is important for cleaning the dipstick, any dripped oil, and your hands. Rags that produce lint could allow contaminants into your engine, so avoid materials that leave behind lint residue.
White Paper
A piece of computer paper, or similar white paper is a great tool for inspecting your oil. This allows you to see contaminants and evaluate possible issues.
Engine Oil
You should always keep at least one quart of the correct engine oil somewhere within your vehicle. This could be in your truck bed, with the spare tire (when it's inside the vehicle), or tucked away in the trunk.
Funnel
While you can pour the oil from the quart directly into the fill cap, any slight mishap could spill the oil across your engine. This can create a mass of smoke when driving, and could start a fire in the worst-case scenario. It’s better to purchase a small funnel (even a paper one) and keep it with your oil in the vehicle.
you can see these car wash related products in shine armor:
- Shine Armor Vacuum Cleaner
- Shine Armor Graphene Ceramic Spray
- Spray Wax Quick Coat for Cars
- Performance Booster Oil Additive
- Armor Suds Graphene Shampoo
Finding the Correct Engine Oil
Your engine is made up of small passages and bearings that require oil. As your engine runs, the oil is pumped from the bottom through these passages to the top of your engine, where gravity pulls it back down to the bottom.
Each engine oil will have a series of numbers known as their rating or weight. It’s important to get oil that matches your specific vehicle. These numbers represent the viscosity of the oil at a low temperature and a hot temperature depending on the rating.
Engine oil that is too thick may not make it through these small passages to lubricate the bearings, and may get stuck in the top of your engine. This would cause the bearings to wear out, and ultimately destroy your engine.
If your engine oil is too thin, it may not appropriately coat the bearings, and may run back into the bottom too rapidly causing aeration issues, and not enough lubrication in the upper end of your engine.
The correct engine oil weight should be available in your owner’s manual, or easily found by typing your year, make, and model followed by “engine oil” into Google. You’ll often also find the number right on the oil cap in the engine bay. Finally, any sales associate in any parts store will also be able to look your vehicle up, and give you the best answer.
Step 1: Start the Engine
You’ll want to start your vehicle and let it run for a few minutes until everything is up to operating temperature. This refers to the temperature of your oil and coolant, similar when you’d normally be driving.
As your vehicle gets hot, the oil changes to its hotter viscosity. When your vehicle is running, certain amounts of oil sits within the bearings, passages, and in the upper end of your engine. For both of these reasons, the engine needs to be run before checking oil.
Step 2: Shut The Car Off
Now that the vehicle is at operating temperature, it’s time to shut everything off. This will reduce the movement of the oil as you attempt to check it. You don’t want the vehicle off very long, but keep in mind everything is hot now, so be careful what you touch in the engine bay.
Step 3: Pop The Hood
The latch is commonly found directly under the steering wheel, just left of your foot while driving, or along the left side of the seat. Other locations are possible and you should check the owner's manual if you have a hard time finding it.
First you will pull the latch, then you must slightly lift the hood, reaching under the front of it, and usually pulling a second latch that sits right under the hood, while lifting the hood. This can be different vehicle to vehicle.
Step 4: Locate the Dipstick
It’s important to find the right dipstick. There is also a dipstick for transmission fluid, which will have bright red liquid, so try to avoid that one.
It’s most common for the engine oil dipstick to be yellow or gold in color, and some are marked with ENG OIL or similar.
Step 5: Clean The Dipstick
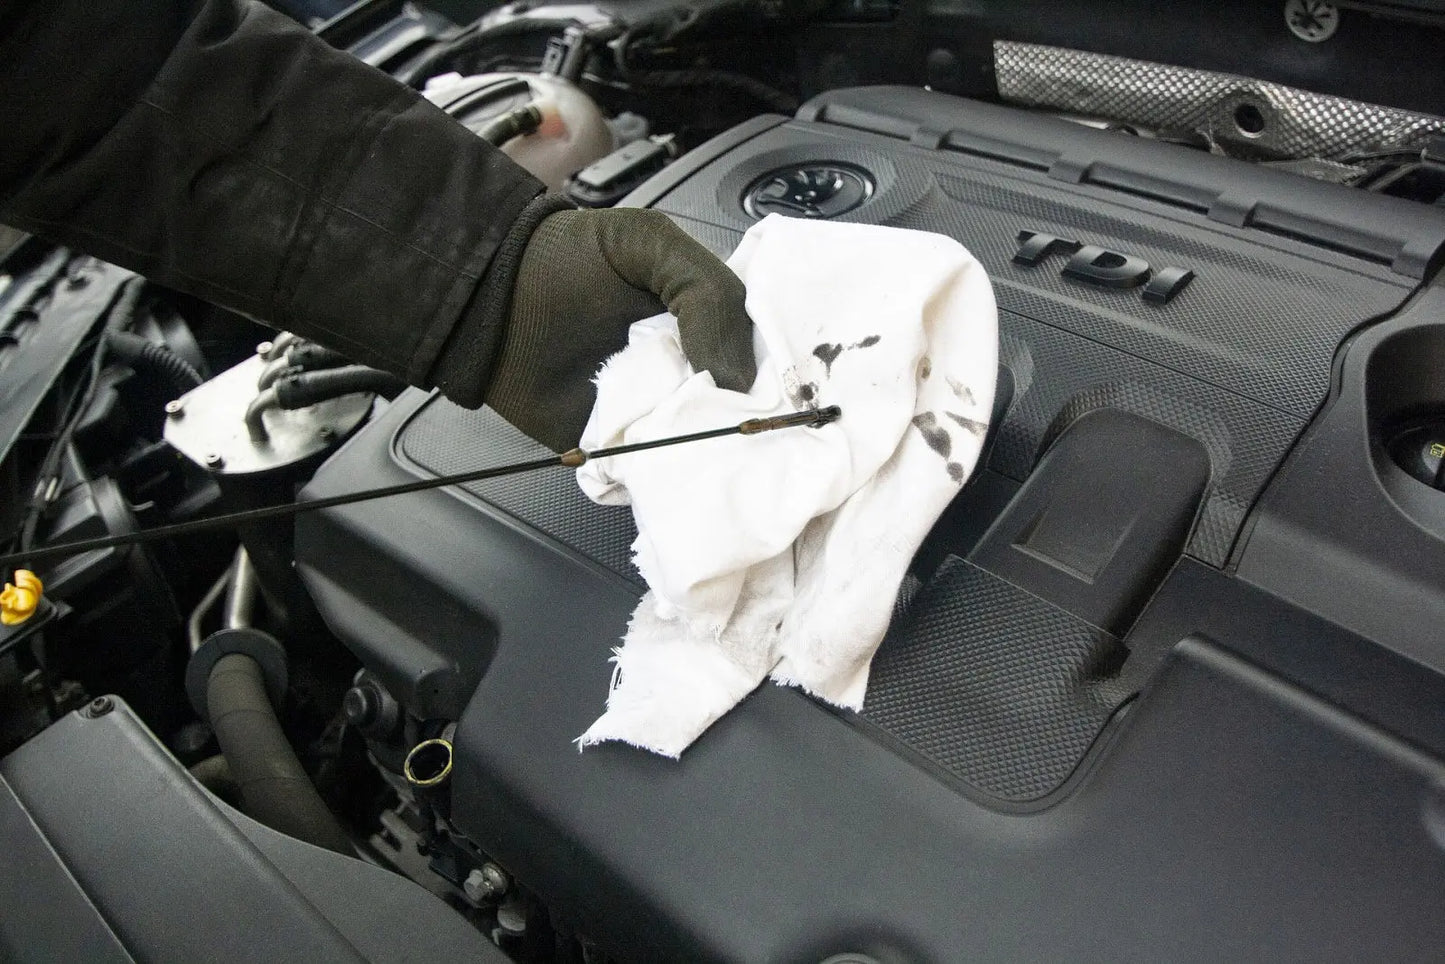
Now that you found the right dipstick, grab your clean rag, pull the dipstick out, and wipe the end clean.
This is a good time to look at the dipstick to see where the level marks are. They should be towards the end and be two lines, or two dots, or some sort of indicator in a set of two.
Put the dipstick in, and be sure it’s pressed all the way down. Some click, some don’t.
Step 6: Check The Oil Level
Pull the dipstick back out, and look where the oil level is compared to those two dots. Be careful not to drip oil from the dipstick into your engine bay.
If the level is towards the upper dot but between the two dots, your level is good.
If it’s above the top dot, it means you're overfilled and may need to remove some oil.
If it’s near the lower dot, you need to add some oil
Step 7: Inspect The Oil
It’s important to inspect your engine oil to catch potential issues.
Smell Tests have you smell the oil and check for signs of burning. If the oil smells sharp or nasty like burnt food, it could mean your vehicle has overheating issues. If the oil smells like gasoline, you most likely have a leaking seal that needs replaced.
Visual Tests can be completed by looking at the oil on the dipstick, or by dripping some of the oil onto a white piece of paper. Looking at the color, you can determine if your oil should be changed. Modern engine oil has a bronze see-through finish, and over time becomes dark. If your engine oil is black, it needs to be changed.
Now look at the oil itself, checking for large pieces of dirt or grime, or even metal shavings. Against the white paper, these large particles should become clear.
Feel Tests involve taking a small amount of oil between your fingers, and rubbing them together. You should be able to feel if there is dirt or grime in your engine.
Step 8: Located the Oil Fill Cap
If your vehicle needs oil, you’ll need to locate your oil fill cap. This is most commonly a black cap, found on the highest point of your engine towards the center of your engine bay.
This cap is usually marked with one or more of the following:
- Engine oil logo, which matches your engine warning lamp on the dash, with an image of an old oil can with a drop coming out of it.
- The word ENGINE OIL or OIL.
- Engine oil weight needed, such as 5W-30 or other recommended weight.
- An image of your owner manual.
Some engine oil caps don’t have any markings on them. You should always confirm with your owner’s manual if you’re unsure.
Shop by category:
Step 9: Add Oil
It’s better to add less engine oil than needed than overfilling it. Overfilling your oil level could cause aeration and lead to engine damage.
It’s common that the distance between the two markings is around 1 quart, but this isn’t guaranteed. If you are near the center of the two markings, start by adding around a quarter of a quart. If you are near the lower marking, start by adding around half a quart.
Step 10: Re-Checking Oil Level
After you’ve added oil to your vehicle, you will once again need to start from the top and run the engine for a few minutes.
At this point, your vehicle should still be near operating temperature and you will primarily be running the engine to distribute the new oil through the passages, berrings, and your engine upper end.
Summary
Properly maintaining your engine alongside your exterior ensures it has everything it needs to run smooth and last you a long time.
Creating a habit to check your engine oil when refueling is a good habit to make. When you stop for gas, your engine's already up to operating temperature and well-circulated, and with practice, an oil check can be accomplished in just a couple of minutes, making this an ideal regular check-in while your fuel is pumping.
With checking your oil being such an important task, with the proper knowledge, you can be sure your vehicle is well protected and well maintained for the long run!


